
The power supply is an essential component in electrophoresis, providing the electrical current needed to separate macromolecules like proteins, DNA, and RNA through a gel matrix. Understanding its function, features, and correct usage is critical for obtaining accurate and reproducible results.
1. Role of the Power Supply
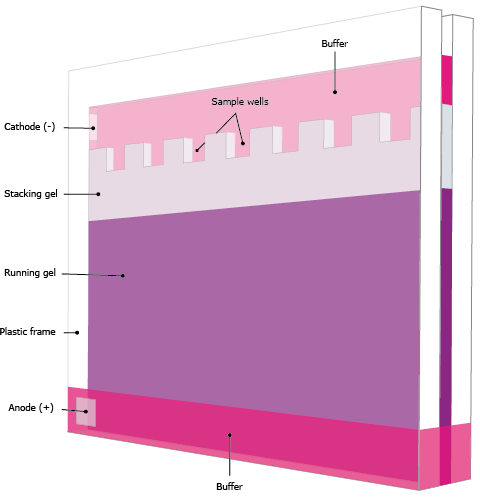
In electrophoresis, molecules migrate through a gel in response to an electric field. The power supply provides the voltage or current required to generate this field. Negatively charged molecules, such as SDS-treated proteins or DNA, move toward the anode (positive electrode), while positively charged molecules migrate toward the cathode (negative electrode). Consistent and controlled electrical conditions ensure uniform migration and sharp, well-resolved bands.
2. Types of Power Supplies
Electrophoresis power supplies come in various types:
-
Constant Voltage Power Supply: Maintains a fixed voltage throughout the run. Most commonly used for protein SDS-PAGE and agarose gels.
-
Constant Current Power Supply: Maintains a fixed current, automatically adjusting voltage as resistance changes. Often used for longer runs or large gels.
-
Constant Power Supply: Maintains constant power (voltage × current). Less common but can be useful in specialized applications.
-
Programmable Power Supplies: Allow the user to set voltage or current ramps, ideal for gradient gels or sensitive experiments.
3. Key Features to Consider
When choosing a power supply for electrophoresis, look for the following features:
-
Voltage Range: Typically 0–300 V for most lab applications. SDS-PAGE and agarose gels usually run between 50–150 V.
-
Current Range: Adjustable to match gel size and type, usually 0–500 mA.
-
Display and Controls: Digital displays for voltage, current, and time make it easier to monitor the run.
-
Safety Features: Overcurrent protection, short-circuit detection, and insulated connections prevent accidents.
-
Dual Channels: Some systems allow simultaneous running of two gels under independent settings.
4. Setting Up the Power Supply
-
Connect Electrodes: Attach the tank electrodes to the power supply, ensuring proper polarity: wells should face the cathode (-), and the opposite end connects to the anode (+).
-
Select Mode: Choose constant voltage or current depending on your protocol.
-
Set Values: Adjust voltage and/or current according to gel type:
-
SDS-PAGE: Stacking gel at ~80–120 V; resolving gel at ~120–150 V
-
Agarose gels: 70–120 V depending on gel size and run time
-
-
Start the Run: Switch on the power supply and monitor the tracking dye to avoid over-running the samples.
5. Tips for Safe and Effective Use
-
Always check that the tank is filled with running buffer before turning on the power supply.
-
Avoid touching electrodes or the buffer while the supply is on.
-
Use gloves and a lab coat for protection.
-
Monitor the gel during the run to prevent overheating or distortion.
-
Turn off and unplug the power supply before removing the gel.
6. Troubleshooting Power Supply Issues
-
No migration: Check connections, buffer level, and correct polarity.
-
Uneven bands: Ensure the gel is level and free of bubbles; confirm stable voltage or current.
-
Overheating: Reduce voltage or use a cooling system for large gels.
Conclusion
A reliable and properly configured power supply is vital for electrophoresis experiments. By understanding its modes, voltage/current settings, and safety features, researchers can ensure reproducible separation of stages of western blotting or nucleic acids. Choosing the right power supply and using it correctly not only improves experimental results but also maintains laboratory safety and efficiency.