Wig Whispers Stylish Solutions for Every Hair Need

You’re likely no stranger to the versatility of wigs, but you might be surprised by the vast array of options available today. From natural hairline wigs that seamlessly mimic real growth to bold color transformations that can change your look in an instant, the choices can be overwhelming. What if you could find the perfect wig that not only suits your personal style but also addresses specific hair needs, such as medical scalp concerns or the desire for a celebrity-inspired look? The key to unlocking this confidence-boosting solution lies in understanding the latest wig innovations – but where do you start?

Natural Hairline Wigs

You’re likely considering natural hairline wigs if you’re in the market for a hairpiece that offers an undetectable hairline. These wigs feature a thin, nearly invisible hairline that mimics the look of your natural hair growth.

The key to achieving this natural look is in the construction of the wig. Natural hairline wigs typically have a monofilament or lace base that allows for parting and styling, just like your own hair.

This type of wig is ideal for those who want a seamless, realistic look. The hairline is designed to blend with your skin tone, creating a flawless finish.

When choosing a natural hairline wig, consider your face shape, skin tone, and hair texture to find the perfect match. You’ll also want to think about the style and length of the wig, as well as the type of hair used – human or synthetic.

With proper care and maintenance, a natural hairline wig can provide a comfortable, confident solution for anyone looking for a natural-looking hairpiece. By selecting the right natural hairline wig, you can achieve a realistic, undetectable look that makes you feel great.
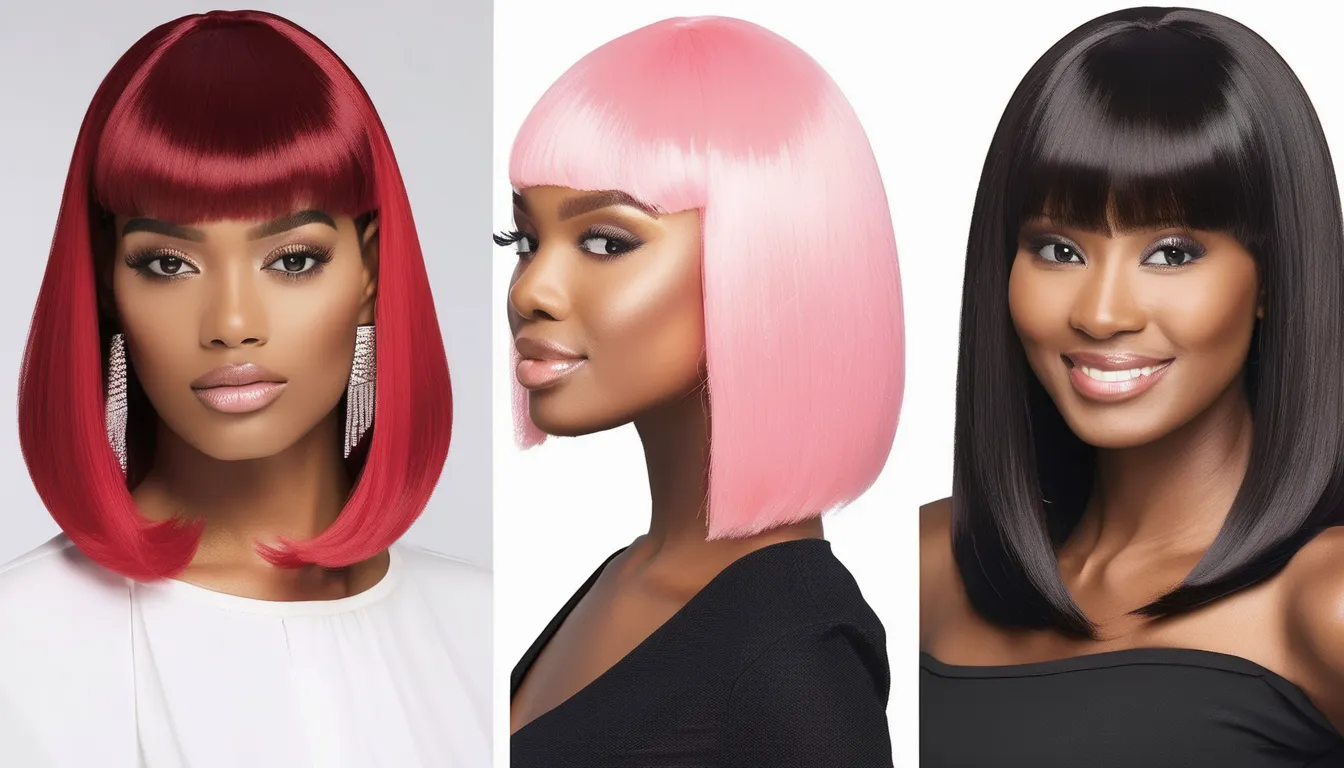
Bold Color Options

Considering a bold, vibrant hairstyle can completely transform your look and boost your confidence. If you’re ready to make a statement, you’re in luck – there are countless bold color options to choose from.

You can opt for a fiery red wig, a sunshine yellow, or a bold blue that’s sure to turn heads. If you’re not ready to commit to a single color, consider a multi-colored wig in bold, contrasting hues.

When selecting a bold color, consider your skin tone and personal style. Cool skin tones look great with blue-based colors, while warm skin tones are complemented by golden hues.

If you have a classic style, a bold, monochromatic color might be the way to go. If you’re more eclectic, a multi-colored wig could be the perfect fit.

Keep in mind that bold colors can be high maintenance. They may require more frequent touch-ups to maintain their vibrancy.

However, with the right care and styling, a bold color wig can be a game-changer for your look and confidence. It’s essential to find a wig stylist who can help you achieve the color you want and provide guidance on maintenance.

Lace Front Wig Styles

How can a lace front wig elevate your style and confidence. The answer lies in its versatility and natural look. A lace front wig offers a seamless hairline, giving the illusion that the hair is growing from your scalp. With a lace front wig, you can achieve a wide range of hairstyles, from subtle and natural to bold and dramatic.

When choosing a lace front wig style, consider your face shape, hair type, and personal preferences. Here are some popular lace front wig styles to consider:

Style Description Suitable For
Straight Bob A classic, chin-length style with straight hair Oval or heart-shaped faces
Curly Layers A voluminous style with loose curls and layers Round or square faces
Pixie Cut A short, stylish cut with choppy layers Oval or diamond-shaped faces
Long Layers A flowy, floor-length style with layered cuts Any face shape
Angled Lob A long, angled style with a subtle asymmetry Oval or heart-shaped faces

With so many styles to choose from, you’re sure to find a lace front wig that fits your unique look and personality.

Medical Hair Loss Solutions

Confidence and self-esteem can take a hit when medical conditions lead to hair loss. If you’re experiencing hair loss due to chemotherapy, alopecia, or other medical conditions, there are wig solutions designed specifically for your needs.

Look for wigs made from breathable materials and natural fibers that promote scalp health. These wigs are often recommended by medical professionals and can be covered by insurance.

When selecting a wig for medical hair loss, consider the type of cap construction that suits your needs. If you have sensitive skin, opt for a monofilament or lace cap that allows for airflow and reduces irritation.

You may also want to choose a wig with a secure fit, such as an adjustable strap or adhesive, to prevent it from shifting during daily activities.

Many organizations offer wig banks or discounts wig individuals experiencing medical hair loss. Research these resources and consult with a medical professional or wig specialist to find the best solution for your specific needs.

They can help you navigate the process and find a wig that makes you feel confident and comfortable.

Celebrity Inspired Wigs

Now that you’ve found a solution for medical hair loss, it’s time to explore the world of fashion and glamour with celebrity-inspired wigs.

You can take inspiration from your favorite celebrities, such as Beyoncé’s luscious locks or Lady Gaga’s bold styles. With the help of a skilled stylist, you can recreate these looks and make them your own.

If you’re looking for a more subtle change, consider emulating the effortless styles of celebrities like Jennifer Lawrence or Emma Stone.

Their natural, effortless looks can be easily achieved with a high-quality wig and the right styling products. You can also experiment with different colors and textures to find the perfect combination that makes you feel confident and glamorous.

To get started, browse celebrity-inspired wig collections online or visit a local salon that specializes in wigs.

Try on different styles and ask for advice from a stylist who can help you find the perfect wig that suits your face shape, skin tone, and personal style.

Conclusion

You’ve found the perfect solution for all your hair needs with Wig Whispers. Whether you’re looking for a natural hairline, a bold new color, or a stylish lace front wig, they’ve got you covered. With medical hair loss solutions and celebrity-inspired styles to choose from, you can find a wig that makes you feel confident and beautiful. Take the first step towards a more stylish you and explore Wig Whispers’ collection today.

Safety First Essential Tips for Bounce House Setup and Maintenance

When setting up a bounce house, you’re not just inflating a fun attraction – you’re creating an environment that needs to ensure the safety of its users. As you prepare to set up your bounce house, take a moment to consider the potential risks involved. Have you inspected the unit for signs of wear and tear? Are you using the correct anchoring techniques for your surface? Neglecting these crucial steps can lead to accidents and injuries. To learn how to avoid these hazards and set up a safe bounce house, let’s start with the essential pre-setup safety checks.

Pre-Setup Safety Checks

Before setting up a bounce house, it’s crucial to conduct a thorough pre-setup safety check to ensure a fun and injury-free experience for users. You’ll want to start by inspecting the bounce house itself, checking for any signs of wear and tear, such as holes, tears, or broken stitching.

Make sure all seams are securely stitched, and there are no loose threads or flapping material.

Next, inspect the bounce house’s electrical components, including any blowers, lights, or other accessories. Check for frayed cords, damaged plugs, or exposed wiring.

Ensure that all electrical components are UL-certified and meet local safety standards.

Additionally, check the area where you’ll be setting up the bounce house for any potential hazards, such as sharp objects, rough surfaces, or standing water.

Clear the area of any debris or obstacles that could interfere with the bounce house’s operation or pose a tripping hazard to users.

Secure Anchoring Techniques

You’ve completed the pre-setup safety checks and are now ready to set up the bounce house. One of the most critical steps is securing the bounce house to the ground to prevent it from tipping or blowing away.

Proper anchoring techniques are essential to ensure the bounce house remains stable and safe for users.

To securely anchor your bounce house, follow these steps:

  1. Choose the right anchors: Use anchors that are specifically designed for bounce houses and suitable for the type of surface you’re setting up on.
  2. Position anchors correctly: Place anchors at least 6-8 feet away from the bounce house and at an angle to provide maximum stability.
  3. Tighten anchors securely: Make sure anchors are tightened firmly to prevent the bounce house from shifting or toppling over.

When setting up the bounce house, always consider the weather conditions and adjust your anchoring techniques accordingly.

For example, in windy conditions, use additional anchors or heavier anchors to provide extra stability.

Proper Inflation Procedures

A key step in setting up a bounce house is proper inflation. You’ll want to make sure you’re using the right equipment and following the manufacturer’s instructions. Typically, you’ll need a blower to inflate the bounce house, and you should always use the blower that comes with the unit or a replacement recommended by the manufacturer.

Inflation Stage Pressure Check
Initial Inflation Check pressure gauge to ensure recommended pressure is reached
Mid-Inflation Verify that the bounce house is standing upright and the walls are firm
Final Check Double-check pressure gauge and ensure the bouncing castle hire ware house is secure and stable

When inflating the bounce house, you should check the pressure gauge regularly to ensure you’re reaching the recommended pressure. You should also verify that the bounce house is standing upright and the walls are firm. Once you’ve reached the final inflation stage, double-check the pressure gauge and ensure the bounce house is secure and stable. Proper inflation is crucial to ensuring the safety of users, so take your time and follow the manufacturer’s instructions carefully.

Regular Maintenance Tasks

Proper inflation is just the beginning of ensuring a bounce house is safe and functional.

To keep your bounce house in top condition, you’ll need to perform regular maintenance tasks. These tasks will help prevent accidents and prolong the lifespan of your equipment.

Regular Maintenance Tasks:

  1. Inspect the bounce house: Look for signs of wear and tear, such as holes, tears, and frayed seams. Check for any damage to the stitching, netting, or other components.
  2. Clean the bounce house: Regularly clean the bounce house to prevent dirt and debris from accumulating. Use a mild detergent and water to wipe down the surfaces.
  3. Check the anchors and tie-downs: Make sure the anchors and tie-downs are securely in place to prevent the bounce house from shifting or toppling over in windy conditions.

Supervising Users Safely

Effective supervision is critical to ensuring users have a safe and enjoyable experience in a bounce house. When setting up a bounce house, it’s essential you have a plan in place for supervising users safely.

You must have at least one adult present to supervise at all times. Make sure this person is within arm’s length of the bounce house and isn’t distracted by other tasks or activities.

You should establish clear rules for users before they enter the bounce house. This includes rules such as no pushing or roughhousing, taking off shoes and jewelry, and no food or drink inside.

You must also ensure users are separated by age and size to prevent injuries. For example, younger children should be separated from older kids and adults.

Regularly inspect the bounce house during use to ensure it remains in good condition. Check for any signs of wear and tear, and address any issues promptly.

Conclusion

You’ve taken the first step in ensuring a safe and enjoyable bounce house experience by following essential setup and maintenance tips. By prioritizing pre-setup safety checks, securing the bounce house with proper anchoring techniques, and maintaining it regularly, you’ll prevent accidents and prolong the equipment’s lifespan. Remember to supervise users safely and enforce rules to guarantee a fun experience for everyone involved. This proactive approach will give you peace of mind and a successful bounce house event.

Elevate Your Presence Mastering the Stage as a Speaker

When you step onto a stage to speak, you’re not just conveying a message – you’re making a statement about yourself and your ideas. Your audience forms an impression in a matter of seconds, and it’s up to you to control that narrative. Mastering the stage requires a delicate balance of confidence, poise, and authenticity. You’ve likely seen speakers who command attention with ease, but what sets them apart? What skills can you develop to elevate your presence and captivate your audience? The answer lies in understanding the intricacies of effective communication – and it’s just the beginning.

Understanding Your Body Language

Standing confidently on stage, you’re about to convey your message to a live audience. Your body language plays a significant role in engaging your listeners and conveying your message effectively. Maintaining good posture is crucial – it exudes confidence and authority.

Keep your shoulders back, chest open, and head held high. Avoid fidgeting or swaying, as these can be distracting.

Make use of purposeful gestures to emphasize key points and add visual interest to your presentation. However, be mindful of over-gesturing, as it can come across as insincere or nervous.

Your facial expressions also convey emotions, so ensure you’re smiling and making eye contact with your audience. This helps build a connection with them and keeps them engaged.

Being aware of your body language allows you to make adjustments and project a more confident and engaging presence on stage. By controlling your non-verbal cues, you’re able to focus on delivering your message and captivating your audience. This, in turn, helps you build trust and establish credibility with your listeners.

Crafting a Compelling Story

As you take the stage, you’re not just conveying information – you’re creating an experience mindful life coach your audience.

Crafting a compelling story is crucial to engaging your listeners and making your message stick. A well-crafted story has the power to evoke emotions, build connections, and convey complex ideas in a simple, relatable way.

When crafting your story, consider the following essential elements:

  1. Start with a hook: Begin your story with an interesting fact, a surprising statistic, or a thought-provoking question that grabs the audience’s attention.
  2. Make it personal: Share your personal experiences, struggles, and successes to create a connection with your audience and make your story more relatable.
  3. Add a clear structure: Use a clear beginning, middle, and end to guide your audience through your story and make it easy to follow.

Mastering Your Stage Presence

You’ve crafted a compelling story, but now it’s time to bring it to life on stage. Mastering your stage presence is essential to engaging your audience and conveying your message effectively.

It starts with confidence and poise. Stand up straight, make eye contact, and own the space you’re in. Avoid fidgeting, swaying, or leaning on the podium, as these habits can make you appear nervous or unprepared.

Your body language should support your message, not distract from it. Use purposeful gestures to emphasize key points, but avoid overusing them. Vary your tone, pitch, and volume to keep your audience engaged.

Practice your delivery to ensure you’re speaking clearly and at a pace that’s easy to follow.

Rehearse in front of a mirror, record yourself, or practice with a friend or family member to get comfortable with your stage presence. Be mindful of your facial expressions and make sure they align with your message.

Building a Strong Connection

Mastering your stage presence is just the first step – now it’s time to build a strong connection with your audience.

A strong connection is what sets great speakers apart from good ones, as it enables you to engage, motivate, and inspire your audience.

You can achieve this by being authentic, vulnerable, and genuinely interested in your audience.

To build a strong connection with your audience, consider the following strategies:

  1. Know your audience: Understand who they are, what they care about, and what they want to take away from your speech. This will help you tailor your message and language to resonate with them.
  2. Use storytelling techniques: Share personal anecdotes, examples, or experiences that illustrate your points and make your message more relatable.
  3. Make eye contact and vary your tone: Engage with different sections of the audience by maintaining eye contact and using vocal inflections to convey enthusiasm, empathy, or emphasis.

Delivering With Confidence

Your message is clear, and you’ve built a strong connection with your audience – now it’s time to deliver with confidence. Your body language plays a crucial role in conveying confidence.

Maintain eye contact with your audience, and avoid fidgeting or swaying, which can give the impression of nervousness. Stand up straight, with your shoulders back and your head held high, to project authority and self-assurance.

Your voice is another essential aspect of confident delivery. Speak clearly and at a moderate pace, avoiding filler words like “um” or “ah.” Vary your tone to add emphasis and keep your audience engaged.

Practice your presentation several times to get comfortable with the material, which will help you deliver it more confidently. Remember, it’s okay to make mistakes – it’s how you recover from them that matters. Don’t apologize excessively or draw attention to your errors; instead, move forward with poise and confidence. With practice and experience, you’ll become more comfortable and confident in your ability to deliver a compelling presentation.

Conclusion

You’ve learned the key elements to elevate your presence as a speaker. By mastering your body language, crafting a compelling story, and delivering with confidence, you’ll captivate your audience and leave a lasting impression. Remember to be authentic and vulnerable, making eye contact and varying your tone to build a strong connection. As you take the stage, own it – your confidence, poise, and authority will shine through, ensuring a successful presentation every time.

Your Step-by-Step Guide to Replacing a Lost Driver’s License in Nebraska

If you’ve lost your Nebraska driver’s license, you’re not alone. Losing an essential document can be stressful, but replacing it is a relatively straightforward process. To get started, you’ll need to gather the required documents, which include proof of identity, residency, and citizenship. But what if you’re not sure what specific documents are accepted or how to proceed? Understanding the necessary steps and requirements will save you time and frustration at the DMV office. Let’s break down the process step by step to ensure you can get back on the road with a new license as quickly as possible.

Gather Required Documents

Gather Required Documents

To get started on replacing your lost driver’s license, you’ll need to round up the necessary documents. The Nebraska Department of Motor Vehicles (DMV) requires proof of identity, residency, and citizenship.

You’ll need to provide one document from each category. For proof of identity, you can use a valid U.S. passport, a certified birth certificate, or a valid permanent resident card. If you’re a non-U.S. citizen, you may need to provide additional documentation.

For proof of residency, you can use a utility bill, a lease agreement, or a bank statement that shows your Nebraska address. Make sure the documents are in your name and dated within the past 60 days.

You’ll also need to provide proof of citizenship, such as a valid U.S. passport or a certified birth certificate. If you’re unsure about which documents to use, you can check the Nebraska DMV’s website for a list of acceptable documents.

Fill Out the Application oldironsidefakes m

With your documents in hand, it’s time to move on to the next step: filling out the application form.

You can download and print the Data Form (also known as the Application for a Nebraska Driver License or State ID Card) from the Nebraska Department of Motor Vehicles (DMV) website, or pick one up from a DMV office.

The form requires you to provide personal and identification information, including your name, date of birth, Social Security number, and Nebraska address.

Carefully review the form and fill it out accurately, making sure to sign and date it.

You’ll need to provide the reason for replacing your driver’s license, so be prepared to explain that it was lost.

If you’ve had a name change, you’ll need to provide proof of the change.

Double-check your application for completeness and accuracy before moving forward.

Incomplete or inaccurate applications may delay the replacement process.

Once you’ve completed the form, you’ll be one step closer to getting a replacement driver’s license.

Visit a DMV Office

Visit a DMV Office

Now that you’ve completed the application form, it’s time to take it to a DMV office. To do this, you’ll need to find a DMV office near you.

The Nebraska Department of Motor Vehicles has multiple locations throughout the state. You can visit their website to find a list of offices, their addresses, and their hours of operation.

Once you’ve found a DMV office, gather all the required documents, including your completed application form, proof of identity, and Nebraska residency.

Make sure you have all the necessary documents before you go, as incomplete applications won’t be accepted. When you arrive at the DMV office, let the staff know that you’re there to replace a lost driver’s license. They’ll guide you through the next steps and let you know what to expect.

Before you proceed, double-check that you have all the required documents and a payment method for the replacement fee.

The DMV office accepts various payment methods, including cash, credit cards, and checks.

Pass the Vision Test

Pass the Vision Test

Located at the DMV office, the vision test is the next step in replacing your lost driver’s license. You’ll need to pass the test to demonstrate your ability to safely operate a vehicle. The test assesses your visual acuity, peripheral vision, and ability to recognize colors.

Vision Test Component Requirements
Visual Acuity 20/40 or better in one eye, with or without corrective lenses
Peripheral Vision 140° or more in the horizontal field of vision
Color Vision Ability to distinguish between red and green colors

You’ll be asked to read letters or symbols from a chart to test your visual acuity. You may also be required to identify objects or colors to assess your peripheral vision and color recognition. If you wear corrective lenses, you’ll be asked to wear them during the test. If you fail the test, you may be required to provide a vision statement from an eye care professional.

Pay the Replacement Fee

After passing the vision test, you’ll proceed to pay the replacement fee for your lost driver’s license. The Nebraska Department of Motor Vehicles (DMV) requires you to pay a fee for a duplicate license.

The cost of a replacement driver’s license in Nebraska is currently $26 for a standard license. If you have a Commercial Driver’s License (CDL), the fee is $47.

You can pay the replacement fee using various methods accepted by the DMV office. These include cash, personal check, money order, or credit card.

Make sure you have the correct payment method with you when you’re ready to pay the fee. If you’re paying by check, ensure it’s made payable to the Nebraska Department of Motor Vehicles.

Once you’ve paid the replacement fee, you’ll be one step closer to receiving your new driver’s license.

Keep your receipt, as you may need it for your records. After paying the fee, you’ll complete the final steps and receive your replacement license, which will be valid for the same period as your original license.

Conclusion

You’re now one step closer to getting back on the road. You’ve gathered the required documents, filled out the Data Form, and visited a DMV office. After passing the vision test and paying the replacement fee, the DMV staff will guide you through the final steps. They’ll process your application and issue a replacement driver’s license. Once you receive it, make sure to review it for accuracy. Your new license will be valid until the original expiration date.

Choosing Between Single-Stage and Two-Stage Paint for Your Car

When it's time to give your car a fresh coat of paint, you're faced with a crucial decision: single-stage or two-stage. You're likely weighing the pros and cons of each option, considering factors like durability, cost, and the desired finish. Two-stage 板金塗装 千曲市 offers a glossy finish with better color retention, but it comes at a higher cost. On the other hand, single-stage paint is more budget-friendly, but its lack of a protective clear coat raises concerns about its longevity. As you consider your options, you might be wondering: which paint choice is right for your car, and what are the potential consequences of your decision?

What Is Single-Stage Paint

When it comes to car paint, you've likely heard of single-stage paint, but what exactly is it. Single-stage paint, also known as single-stage urethane, is a type of paint that combines the color and clear coat into one layer.

This differs from other paint types, where the color and clear coat are applied in separate layers. Single-stage paint is typically applied in a thicker coat than other paints, which provides protection and durability.

Single-stage paint is usually made up of a mixture of resin, pigment, and solvent. The resin provides the paint's durability and adhesion to the car's surface, while the pigment gives the paint its color.

Single-stage paint is often used on older cars, as it's less expensive than other paint types and provides an adequate finish. However, it's worth noting that single-stage paint may not provide the same level of shine and durability as other paint types.

If you're considering single-stage paint for your car, make sure to choose a reputable brand and follow the manufacturer's application instructions carefully. This will ensure a high-quality finish that lasts.

Two-Stage Paint Explained

Most car owners considering a new paint job will likely encounter two-stage paint as a viable option. Two-stage paint, also known as basecoat-clearcoat, is a type of paint that consists of two separate layers: a basecoat and a clearcoat.

You first apply the basecoat, which provides the color and hides any imperfections in the car's surface. This layer is usually made up of a mixture of pigments, resins, and solvents.

Once the basecoat is dry, you apply a clearcoat on top. The clearcoat is a transparent layer that protects the basecoat from the elements and provides a glossy finish. This layer is typically made up of a mixture of resins and solvents.

It's essential to note that two-stage paint requires a specific application process, and it's not as straightforward as single-stage paint. You'll need to ensure that each layer is fully dry before applying the next one. Additionally, two-stage paint may require additional preparation and equipment to achieve the desired results.

Durability and Chip Resistance

Two-stage paint's layered application process not only affects its appearance but also impacts its performance. When you choose two-stage paint for your car, you're essentially applying a clear coat over the base coat. This clear coat acts as a protective barrier, shielding the paint from the elements and reducing the risk of chips and cracks.

As a result, two-stage paint tends to be more durable than single-stage paint.

In contrast, single-stage paint doesn't have the same level of protection. Without a clear coat, the paint is more exposed to the elements, increasing the risk of chips and cracks. However, single-stage paint can still be a good option if you're looking for a more affordable alternative.

When considering durability and chip resistance, think about how you plan to use your car. If you'll be driving in harsh weather conditions or using your car for off-road adventures, two-stage paint may be the better choice.

However, if you'll be driving mostly in dry conditions and want a more budget-friendly option, single-stage paint could work for you.

Color and Gloss Retention

As you weigh your paint options, consider how color and gloss retention will impact your car's appearance over time. A paint job that holds its color and gloss well can maintain your car's showroom shine for years to come.

Two-stage paint is often preferred for its superior color and gloss retention. The clear coat in a two-stage system acts as a protective barrier that shields the base coat from the elements, minimizing fading and discoloration.

In contrast, single-stage paint can be more prone to fading and discoloration since it lacks a separate clear coat. However, some single-stage paints are formulated with advanced resins and UV blockers that help retain color and gloss.

If you choose single-stage paint, look for products with these added protections to ensure the best possible results.

When deciding between single-stage and two-stage paint, think about your car's exposure to sunlight, road salt, and other environmental stressors. If your car will be frequently exposed to harsh conditions, a two-stage system may be the better choice for maintaining its color and gloss.

Cost and Time Comparison

When it comes to choosing between single-stage and two-stage paint, the cost and time required for application often play a significant role in the decision-making process.

You'll want to consider the initial investment and the time you'll spend waiting for the paint to dry and cure.

In general, single-stage paint is less expensive than two-stage paint, with prices starting at around $100 per gallon. Two-stage paint, on the other hand, can cost upwards of $200 per gallon.

However, it's essential to note that two-stage paint often lasts longer and requires less maintenance, which can offset the higher upfront cost.

Time is also a critical factor. Single-stage paint typically dries faster, allowing you to handle your car within a few hours.

Two-stage paint, however, requires a separate clear coat application, which can add an extra day or two to the overall process.

You'll need to weigh the benefits of each option against the time and money you're willing to invest. Consider your budget, schedule, and desired outcome to make an informed decision.

Conclusion

You're now equipped to make an informed decision between single-stage and two-stage paint for your car. Consider your priorities: if budget and speed are key, single-stage might be the way to go. However, if you're after a high-gloss, durable finish that withstands the elements, two-stage is the better choice. Weigh the pros and cons, think about your driving habits, and choose the paint that best fits your car's needs and your wallet.